Coding Every Day for a Month
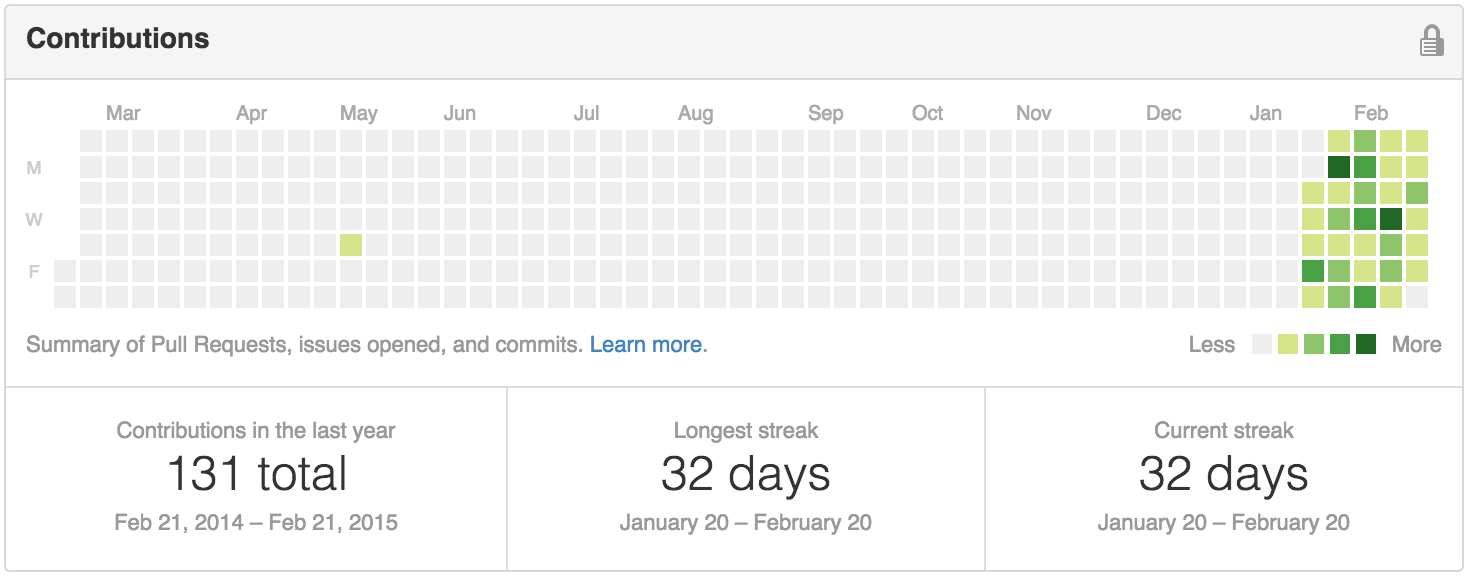
21 Feb 2015 | permalink

I’ve been frustrated for a few years by the fact that I don’t code as much as I’d like to. At Stanford I’m surrounded by people who are working on personal projects in their free time, but my personal project time has normally been consumed by section leading and mock trial. So a little over a month ago, I decided that I was going to set my sights modestly: I wanted to make one commit a day, every day. These are the results so far:

A stats chart from Github of my activity over the last month

So far I’ve made:

  • 126 commits (this post will be the 127th)
  • across 7 repos
  • with 4129 additions and 2139 deletions
  • in 6 different languages.

I don’t necessarily think that coding every day is making me a better programmer. I’m working with a lot of new technologies I don’t have experience with, and there’s nobody guiding me through it, so I have no way of knowing if I’m doing the write thing, or if I’m doing it the right way.

Another downside to coding every day is that it’s difficult to tackle big problems. When I’m worried about getting a commit done for the day, I’m less likely to invest time in figuring out how to solve a big problem; I’ll default to something that, though possibly still challenging, is something that I know I’ll be able to manage. The most obvious (public) example of this is my Shaping Up With Angular project, based off of the Code School class of the same name, which stalled out once I realized I couldn’t quite figure out how to make authentication work the way that I wanted it to.

Despite the downsides though, I’m still very happy that I took on the challenge. Sure, I might be struggling with the bigger problems, but before I rarely encountered any problems outside of my school work. My goal for the next month is to see if I can figure out a way to encourage spending more time on bigger problems, or reward myself for days that are primarily (or entirely) research-driven. Now that I have a decent streak going, the compulsion not to “break the chain” is strong.

Sublime Unity

27 Jan 2015 | permalink

Recently I’ve been playing around with Unity, but I quickly realized I wasn’t a huge fan of MonoDevelop. I’d rather work in an environment I already felt comfortable in, so I decided to figure out how to set up Sublime Text to develop for Unity.

The instructions for how to do so are spread out across a couple different sites, so I thought I’d collect all the steps here at least for my own reference, but hopefully someone else finds it helpful too. These instructions have only been tested on OS X Yosemite.

Step One. Install Sublime Text. Step zero, really.
Step Two. Install Package Control. This makes installing packages and extensions for Sublime Text painless.
Step Three. Use Package Control to install Unity3D Syntax Highlighting.

This gets a very basic environment set up for using Sublime Text for Unity. However, you don’t get nice things like autocompletion or compilation up front. The best way to get that set up is with Omnisharp, which has a few prerequisites.

Step Four. Install Homebrew. I use Homebrew all the time as my package manager.
Step Five. Use Homebrew to install Mono (brew install mono)
Step Six. Use Package Control to install Omnisharp.
Step Seven. Before you can actually use Omnisharp with a Unity project, you need to create a Sublime project file that identifies the solution file for Omnisharp. This is the standard template I’ve used.

{
    "folders":
    [
	    {
		    "path": ".",
		    "file_exclude_patterns": ["*.meta"],
	    },
    ],
    "solution_file": "./NAME_OF_PROJECT.sln"
}

I’m still toying with the right path to use/files to exclude here. I initially made the path “Assets/Scripts” because I only wanted to see the actual files I would be editing in Sublime. But I also wanted to be able to easily edit the project file in case I needed to make any tweaks.

At this point, you can easily use Sublime to edit any Unity scripts that you like. Each time you save the file the log should pop up at the bottom to show you any compilation errors or warnings. There’s one last step to make it a little bit easier to integrate Sublime with Unity.

Step Eight. Set Sublime Text to be the default editor of Unity. Go to Preferences, select External Tools, and choose “Sublime Text” from the External Script Editor dropdown menu.

Now when you double-click a script in Unity, it should open in Sublime Text. For me, it’s a much more comfortable environment than working in MonoDevelop.

Update (2/6/2015): After playing with this a little more, I realized that you actually need to open the project in MonoDevelop at least once to generate the solution file and get the autocompletion enabled in Sublime. I’m still looking to see if there’s a way to simplify it, but haven’t figured it out yet.